Unlocking Creativity: A Practical Guide to the Gnome Procreate Stamps Set
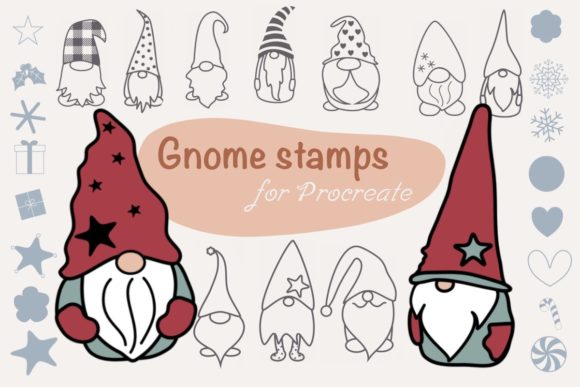
Digital illustration often feels like a race against time, especially when you are trying to meet client deadlines or launch a new product line. Many creators find themselves stuck in the repetitive loop of drawing the same elements over and over again. This is where a specialized tool like the Gnome Procreate Stamps Set changes the workflow entirely. Instead of sketching every tiny detail from scratch, this collection offers sixteen unique gnome stamps and sixteen complementary decorative stamps designed specifically for the Procreate app. However, simply downloading assets isn't enough; understanding how to integrate them effectively into your workflow is what separates amateur designs from professional-grade work.
The primary appeal of this set lies in its versatility. Whether you are designing digital invitations, creating custom stickers, crafting social media graphics, or preparing gift tags, these brushes allow you to speed up the design process significantly. Yet, a common misunderstanding among beginners is treating stamp brushes as static images that cannot be altered. This mindset limits the potential of the tool. The reality is that these stamps are fully dynamic. You can scale them, resize them without losing quality, change their colors, and even paint over them to add your own personal details. Treating them as rigid clipart rather than flexible design elements is the first mistake many users make, leading to generic-looking results that lack a cohesive style.
Avoiding the "One-Size-Fits-All" Trap
When you first open the Gnome Procreate Stamps, the temptation is to tap the canvas and leave the image exactly as it appears. While the default look is cute and polished, relying solely on the out-of-the-box appearance can make your project feel disjointed if the lighting or color palette doesn't match the rest of your artwork. A frequent error is ignoring the color adjustment features. Since these stamps are vector-based or high-resolution raster masks within Procreate, they respond beautifully to the Alpha Lock and Clipping Mask functions.
To avoid a patchy final presentation, always check the color harmony before finalizing your layout. For instance, if you are creating a winter holiday invitation with a muted, pastel background, placing a high-saturation, default-colored gnome might clash visually. The better approach is to tap the stamp onto your canvas, enable Alpha Lock on that layer, and then use a soft airbrush to paint over the gnome with colors that match your specific theme. This simple step ensures that the asset feels like it was drawn specifically for that project, rather than pasted on top of it.
Maximizing Efficiency Without Sacrificing Quality
Another area where creators often stumble is in the organization of their layers. Because these stamps are so easy to use—requiring just a simple tap with your Apple Pencil or finger—it is easy to end up with a chaotic layer stack. If you are building a complex scene with multiple gnomes and decorative elements, failing to group your layers can make later edits frustrating. Imagine needing to move a specific gnome three days after starting a project and realizing you have to hunt through fifty unlabelled layers.
The solution is disciplined layer management from the start. As soon as you place a stamp from the Gnome Procreate Stamps Set, rename the layer to reflect its content (e.g., "Gnome_Hat_Red" or "Decor_Leaf_Green") and group related elements together. This practice not only saves time during the editing phase but also makes the file easier to hand off to clients or collaborators. Furthermore, remember that you can combine the sixteen gnome stamps with the sixteen decor stamps to create entirely new characters. Don't be afraid to overlap a hat stamp with a different body stamp to create a custom variation that isn't explicitly in the original pack. This level of customization adds unique value to your work and prevents your designs from looking identical to others who own the same set.
Technical Considerations for Professional Results
Before purchasing or downloading any digital asset, it is crucial to verify compatibility and file structure. This specific set arrives as a single ZIP file containing two distinct brush sets: one for the gnomes and one for the gnome decor. A common oversight occurs when users try to import the ZIP file directly into Procreate without unzipping it first, leading to confusion when the brushes don't appear. Always ensure you extract the contents on your iPad or computer before importing the .brushset files into the app.
Additionally, consider the resolution of your canvas. While these stamps are scalable, starting your project on a canvas that is too small can limit the detail you can add when painting over the stamps. If you plan to print your designs, such as for physical stickers or high-quality greeting cards, set your DPI to at least 300 before you begin tapping down your stamps. Trying to upscale a low-resolution canvas later can result in pixelation, undermining the crisp quality of the original stamp brushes.
- Check File Integrity: Ensure the ZIP file extracts correctly to reveal the two separate brush sets.
- Canvas Setup: Set your resolution to 300 DPI early if the final output is intended for print.
- Layer Strategy: Use clipping masks to recolor stamps non-destructively.
- Customization: Combine different stamps to create unique character variations.
Making the Right Choice for Your Workflow
Ultimately, the value of the Gnome Procreate Stamps depends on how well they integrate into your specific creative goals. For entrepreneurs selling digital planners or physical goods, these tools offer a way to maintain consistent branding while reducing production time. For educators and bloggers, they provide a quick method to illustrate concepts with engaging visuals. However, the key to satisfaction is viewing these stamps as a foundation rather than a finished product.
By taking the time to adjust colors, organize layers, and combine elements creatively, you transform a standard asset into a bespoke part of your artistic voice. Avoid the pitfall of rushing the process; the few extra minutes spent refining the details of a stamp can elevate the perceived quality of your entire project. When used with intention and technical awareness, this set becomes more than just a collection of images—it becomes an efficient partner in your creative journey, helping you deliver high-quality work faster and with greater confidence.